What Actually Causes Tearout in Figured Wood
A woodworker planes curly maple. The first eight inches go beautifully - the surface gleams, the shaving curls up in a perfect ribbon. Then the plane hits a figured section. The blade catches, chatters, and rips fibers straight out of the wood. Where there was glass, now there are craters.
The blade didn't dull. The technique didn't change. The wood changed.
Grain direction reversed. And that reversal - the same thing that makes figured wood beautiful - is exactly what makes it fight back.
Why the Grain Reverses
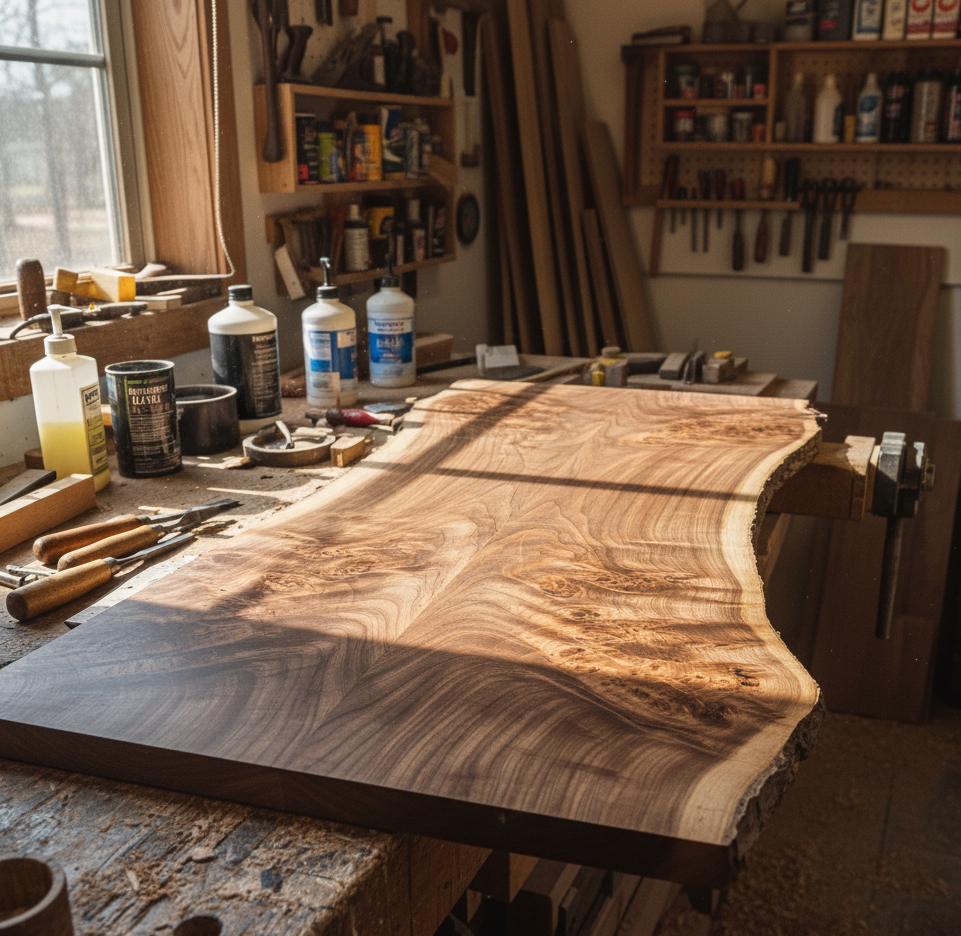
Wood fibers grow in directions determined by the tree's growth patterns. Straight-grained wood has fibers running parallel to the trunk, a neat bundle of structural cellulose all headed the same way. Figured wood doesn't cooperate. The fibers change direction - diving into the board, emerging, diving again. These reversals create the shimmering visual patterns that make people pay three times the price for a piece of curly maple.
Look at it closely. In one spot, fibers angle upward toward the surface at 20 degrees. An inch away, they angle downward at 20 degrees. The reversal happens over short distances - sometimes as little as 1/4 inch.
When a cutting edge approaches wood with the grain - fibers angling away from the cut - it slices cleanly. Fibers separate with minimal force. When that same edge approaches against the grain - fibers angling toward the cut - it tries to lift fibers before cutting them. The blade gets under the fiber ends and levers them upward. They break above the cut line instead of at it. That's tearout.
Figured wood presents both orientations simultaneously. One zone cuts cleanly. The adjacent figured zone tears out. No single cutting direction works for the entire board. Every pass produces some tearout somewhere.
The severity scales with the figure. Gentle wavy grain with 10-degree fiber deviation tears out minimally. Tight curl with 30-degree fiber angles tears out dramatically. Quilted figure - multiple directions in close proximity - tears out worst of all.
Then there's bird's-eye maple. Each "eye" is a tiny whorl of grain surrounding a bud formation. The grain spirals around these spots in all directions within a quarter-inch area. A cutting edge encounters every possible grain orientation in a space smaller than a fingertip. Clean cutting becomes nearly impossible.
The Angle Problem
A cutting edge approaching wood at 35 degrees from horizontal slices fibers with minimal compression. At 60 degrees, it compresses fibers before cutting. That compression changes everything about how tearout develops.
Low-angle cutting on straight grain with favorable direction produces the cleanest surfaces possible. The edge enters at a shallow angle, separating fibers like a wedge through kindling. But against the grain, that same shallow angle gets under fiber ends and levers them up. The geometry that makes with-grain cutting perfect makes against-grain cutting catastrophic.
High-angle cutting approaches wood more steeply. The blade compresses fibers ahead of the cut, preventing them from lifting. Fibers get crushed and sheared rather than levered. Against-the-grain tearout drops significantly because compression prevents the lifting that causes craters.
The tradeoff: high-angle cutting takes more muscle. A hand plane becomes noticeably harder to push. Power tools draw more current. Feed rates drop. The compression that prevents tearout also increases cutting resistance.
Some figured woods respond well to high angles. Others still tear out. No single cutting angle solves all figure problems, which is the kind of frustrating truth that makes woodworking feel like it has a sense of humor.
Why Blade Sharpness Gets Exponentially More Important
A blade that cuts straight grain acceptably while slightly dull tears figured wood catastrophically. The difference between "acceptable" and "catastrophic" happens in thousandths of an inch.
A truly sharp edge - 0.001 to 0.002 inch radius - parts fibers with minimal side force. Clean separation at the cut line. A dull edge at 0.005 to 0.010 inch radius pushes fibers sideways before cutting. That sideways force tears fibers instead of severing them. Figured wood, with its reversing grain, magnifies the effect. Against-the-grain sections get torn by even slight dullness because the blade catches on fiber ends, levers them up, and rips them free.
The practical consequence: honing frequency matters more with figured wood than with straight grain. A blade that stays sharp for 100 feet of straight-grain planing might need sharpening after 20 feet of figured wood. The reversing grain stresses the edge more. Dulling happens faster. Tearout increases correspondingly. Micro-chipping of cutting edges from hard spots or abrasive inclusions creates localized dull spots where tearout concentrates.
The Chipbreaker Discovery
Chipbreakers - also called cap irons - bend shavings upward as they form. But the more interesting effect happens ahead of the cut. Close chipbreaker settings create intense compression in the wood directly before the cutting edge reaches it. That compression prevents fibers from lifting even when grain reverses.
The distance from cutting edge to chipbreaker determines everything. Set the chipbreaker 1/16 inch back and the compression is minimal - shavings form and lift before reaching the breaker. Tearout develops normally. Set it 1/64 inch back and the compression is fierce. Shavings curl immediately. Fiber lifting gets suppressed before it starts.
Research by Kato and Kawai showed chipbreaker settings under 0.020 inch dramatically reduce figured wood tearout - more effectively than changing the cutting angle. The chipbreaker turns out to be the single most powerful anti-tearout tool on a bench plane.
The tradeoffs: close settings produce tightly curled shavings that jam the plane mouth more often. Cutting resistance increases. The plane becomes harder to push. Clearing clogs becomes frequent. The reduced tearout comes at the cost of slower, more interrupted work - a negotiation between surface quality and throughput that figured wood forces on every operation.
The Depth-of-Cut Relationship
Thin shavings tear out less than thick ones. A 0.001-inch cut might leave the surface smooth. A 0.010-inch cut rips fibers free. The thicker cut lifts fibers further before severing them. Deeper lifting means worse craters.
The relationship isn't linear - it's exponential. Doubling cut depth more than doubles tearout severity. A 0.005-inch cut produces minor surface disruption. A 0.010-inch cut produces major craters. The last few thousandths of depth cause disproportionate damage.
This is why final smoothing operations on figured wood use cuts so light the shavings are translucent. A smoothing plane set for 0.001-inch passes produces acceptable results on wood that tears out violently at 0.005 inches. The ultra-light cut minimizes fiber lifting regardless of grain direction.
Multiple light passes work better than single heavy passes. Three passes at 0.003 inches each produce less total tearout than one pass at 0.009 inches. More time, better surface. The staged approach accepts that perfect first-pass machining isn't achievable on figured wood.
When Scraping Wins
Scrapers remove wood by abrasion rather than slicing. A card scraper or scraper plane held at 90 degrees to the surface doesn't lift fibers - it scrapes them off. Grain direction becomes irrelevant. Tearout essentially disappears.
The scraping action works through a burr on the scraper edge, formed by burnishing - a tiny hook that pulls fibers free at such a small scale that fiber lifting never occurs. Even wildly reversing grain gets scraped clean.
The cost is speed. A sharp plane removes 0.005 to 0.010 inches per pass. A scraper removes 0.0005 to 0.001 inches per pass. Ten times as many passes for the same material removal. But the two-stage approach works efficiently in practice: plane close to final thickness accepting some tearout, then scrape to remove the tearout plus remaining material. Power tools for bulk removal. Hand tools for the final surface.
Scraper planes like the Stanley No. 80 or No. 112 provide better control than card scrapers - consistent blade angle, consistent pressure, flatter results. Card scrapers flex and dig. Both work, but the plane delivers better flatness.
Power Tool Configurations
Helical or spiral cutter heads on thickness planers present each carbide insert at a slight skew to the feed direction. This skewed approach reduces tearout compared to straight knives - dramatically so with figured wood. The continuous skew means some portion of the cutter head always cuts favorably even when grain reverses.
Smaller inserts (1/4 inch square) create smoother surfaces than larger ones (5/8 inch square). More individual cuts per inch of feed, smaller tearout spots, smoother apparent surface. Cutter head speed matters independently of feed rate - faster rotation means more cuts per inch at any feed speed.
Routers with spiral bits reduce tearout versus straight bits through similar physics. Down-spiral bits compress fibers into the cut. Up-spiral bits lift fibers. Down-spiral wins for figured wood. Feed rate creates its own balancing act - too slow and bits burn the wood, too fast and they overload. An intermediate sweet spot exists for each wood and figure pattern, found through the kind of experimentation that burns a few test pieces.
Species and Moisture
Some species figure frequently. Maple, ash, and certain mahoganies show figure in 10 to 20 percent of boards. The figure that makes them valuable creates the tearout that makes them difficult. Curly maple shows predictable tearout patterns. Quilted maple tears out worse. Bird's-eye is nearly impossible to machine without some damage.
Mahogany's ribbon figure machines reasonably well with proper technique. Its crotch figure tears out spectacularly. Pommele falls in between. The same species presents completely different challenges depending on figure type.
Tropical species often show interlocked grain - fiber direction spiraling around the trunk in alternating bands. Every few inches, grain direction reverses 180 degrees. Tearout happens in predictable bands corresponding to each reversal.
Moisture content shifts the equation further. Dry wood at 6 to 7 percent moisture machines with the least tearout - stiff fibers resist lifting. The same wood at 12 percent tears out more because softer fibers lift more easily. Bringing air-dried figured lumber into a dry shop for several weeks before machining lets it reach 7 to 8 percent. The tearout difference is noticeable.
What the Physics Demand
Figured wood tearout reduces through combinations, not single solutions. Sharp blades. Light cuts. Appropriate cutting angles. Close chipbreakers. No single technique eliminates it completely. The staged approach recognizes reality: rough dimension with power tools accepting some tearout, then progressively lighter passes, then hand tools or scrapers for the final surface.
The grain direction reading that works on straight stock fails on figured wood. Quilted maple runs multiple directions simultaneously. Bird's-eye spirals around each eye. Crotch figure flows in three dimensions. Rather than trying to work with grain direction, techniques that work regardless of direction become necessary.
And some figured wood tears out regardless of technique. Extreme figure, tight reversals, soft fiber structure - combinations that defeat even expert approaches. Sanding becomes the only practical finishing method. The figure that makes the wood valuable also makes it difficult to work. That tension - beauty and difficulty bound together at the cellular level - is one of those things about woodworking that never quite stops being interesting.